Using layout blocks
List of blocks you can use:
- customer
- menu
- main_menu
- search
- language
- currency
- cart
- category
- breadcrumbs
- account
- newsletter_signup
- credit_cards
- special
- featured
- bestsellers
- chat_block
- html_block
- custom_form_block
- banner_block
- listing_block ..
Block Configuration
Currently applied to twos blocks listing_data & banner_block. Allows us to add more fields to the edit block page and use the jquery library of our choice for that block on storefront.
We provide javascript libraries that meet the needs of a rich theme, to load a library you just declared by name. This avoids duplicate libraries you insert into the site.
Each .tpl file has a configuration file of the same name in .xml format and resides in the same directory as the template .tpl file. Ex: we have a blocks/listing_block/main_categories.tpl Corresponds to the configuration file blocks/listing_block/main_categories.xml
<?xml version="1.0" encoding="UTF-8"?>
<block_config>
    <name>test 4</name>
    <description><![CDATA[test 3 description]]></description>
    <author><![CDATA[Hoang]]></author>

    <preview><![CDATA[images/test.jpg]]></preview><!-- inside image folder -->
    <help><![CDATA[Help content]]></help>

    <!-- options, inherit from extension configuration file -->
    <options>
        <item name="field-1">
            <type>selectbox</type>
            <title><![CDATA[test_4-field1]]></title>
            <desc><![CDATA[4e9750345urjglflfhfghf;e057435]]></desc>
            <attributes><![CDATA[style="border:1px solid red"]]></attributes>
            <default_value>bestsellers</default_value>
            <variants>
                <_AI_>bestsellers</_AI_>
                <_AI_>latest</_AI_>
                <_AI_>specials</_AI_>
                <_AI_>featured</_AI_>
            </variants>
        </item>
        <item name="field-2">
            <type>checkbox</type>
            <default_value>0</default_value>
        </item>
                ...
    </options>

    <!-- theme setting -->
    <settings>
        <item>
            <type>js_libs</type>
            <data>
                <_AI_><![CDATA[marquee/endless-div-scroll]]></_AI_>
            </data>
        </item>

        <item>
            <type>styles</type>
            <data>
                <_AI_><![CDATA[style.css]]>]</_AI_>
            </data>
        </item>
        <item>
            <type>scripts</type>
            <data>
                <_AI_><![CDATA[js.js]]>]</_AI_>
            </data>
        </item>

    </settings>
</block_config>
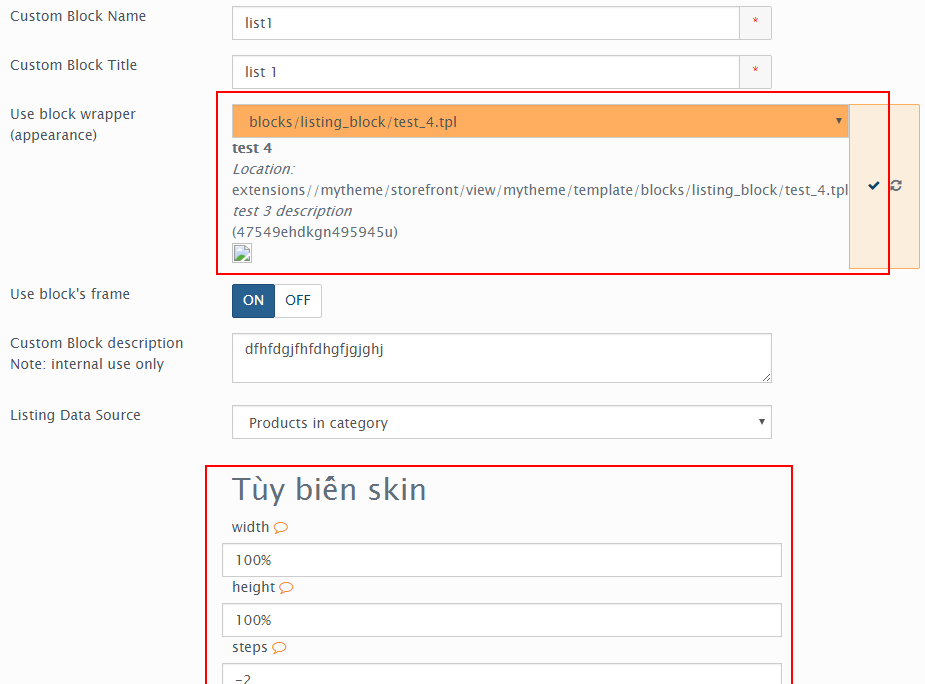
Tags <name, <description, <author, <preview, <help display information about block template. On the block content edit page, you will see the block tpl information if found.
Assets
Declare to use .css, .js, and javascript library when the block is loaded in the site. You write in <scripts tag.
<!-- theme setting -->
<settings>
        <item>
                <type>js_libs</type>
                <data>
                        <_AI_><![CDATA[marquee/endless-div-scroll]]></_AI_>
                </data>
        </item>

        <item>
                <type>styles</type>
                <data>
                        <_AI_><![CDATA[style.css]]>]</_AI_>
                </data>
        </item>
        <item>
                <type>scripts</type>
                <data>
                        <_AI_><![CDATA[js.js]]>]</_AI_>
                </data>
        </item>

</settings>
Note: The asset file path is similar to the theme configuration file theme.xml Some good libraries use:
- Background effects:
bg-effects/snowbg-effects/FireWorksNewYear
- Galleries
galleries/jgallerygalleries/photor- ...
Similarly, if you want to add library files, full declaration as follows:
<item>
        <type>js_libs</type>
        <data>
                <_AI_>
                        <param name="name"><![CDATA[sliders/nivoSlider]]></param>
                        <!-- each file separate by | -->
        <param name="styles"><![CDATA[light.css]]></param>
                </_AI_>
        </data>
</item>
Options
To add an option to the block, you declare it in the <options tag.
<options>
        <item name="f1">
                <type>selectbox</type>
                <title><![CDATA[test_4-field1]]></title>
                <desc><![CDATA[4e9750345urjglflfhfghf;e057435]]></desc>
                <attributes><![CDATA[style="border:1px solid red"]]></attributes>
                <default_value>bestsellers</default_value>
                <variants>
                        <_AI_>bestsellers</_AI_>
                        <_AI_>latest</_AI_>
                        <_AI_>specials</_AI_>
                        <_AI_>featured</_AI_>
                </variants>
        </item>
        <item name="f2">
                <type>checkbox</type>
                <default_value>0</default_value>
        </item>
        <item name="f3">
                <type>input</type>
        <default_value><![CDATA[.next]]></default_value>
        </item>
</options>
If you declare use of libraries, libraries may have additional options that will be added to the fields you have declared above. Note: Take only the options of the first library.
Js Options use in .tpl
The options you save with blocks are stored in the $options variable. For example, you can use options to adjust the jquery library settings.
PHP:
<script>
    $(window).load(function () {
        $("#brand_carousal").endlessScroll(<?php echo HW_SKIN_Option::build_json_options($options)?>);

        // Recopy the previous line to add scrolling to other divs.
    });
</script>
Template engine:
<script>
    $(window).load(function () {
        var options={{ staticCall('HW_SKIN_Option','build_json_options',options) }};
        $("#brand_carousal").endlessScroll(options);
    });
</script>